
どうも、白夜霧(@KiRi_Byakuya)です。
今回は、MySQLの日本語文字化け問題の解決方法の覚書です。
【結論】Windows環境のMySQLの日本語文字化けの原因は『文字コードの設定』

MySQLのDBに、日本語データを入力して文字化けになる原因は、主に下記の2つらしい。
[st-cmemo fontawesome=”fa-lightbulb-o” iconcolor=”#FFA726″ bgcolor=”#FFF3E0″ color=”#000000″ bordercolor=”” borderwidth=”” iconsize=””]
- ①DBの文字コードと、表示側のコマンドプロンプトの文字コードが不一致で、表示だけ化けている。
- ②日本語非対応の文字コードが設定されているDBに、日本語のデータを入力(保存)してしまっている。
[/st-cmemo]
私の場合は②が原因で文字化けが発生していました。
構築環境(MySQL)

本記事では、下記の環境で確認しています。
[st-cmemo fontawesome=”fa-file-text-o” iconcolor=”#919191″ bgcolor=”#fafafa” color=”#000000″ bordercolor=”” borderwidth=”” iconsize=””]
- Windows 11 Home
- XAMPP(Apache + MySQL + PHP)
[/st-cmemo]
XAMPP(ザンプ)については、下記記事を参考にして下さい。
[st-card myclass=”” id=”16414″ label=”” pc_height=”” name=”” bgcolor=”” color=”” fontawesome=”” readmore=”on” thumbnail=”on” type=””]
[st-cmemo fontawesome=”st-svg-bigginer_l” iconcolor=”#9CCC65″ bgcolor=”#F1F8E9″ color=”#000000″ bordercolor=”” borderwidth=”” iconsize=””]
本記事ではWindows環境を前提としております。
[/st-cmemo]
MySQLの日本語の文字化けを治す方法①
コマンドプロンプトの文字コードの設定を変更する
この方法は、DBのデータを表示しているコマンドプロンプト側の設定が、データベースとは異なる文字コードで設定されているために、単純に表示されているデータ”だけ”が文字化けしている、という場合の解決方法です。
DBが悪いわけではなく、表示側の問題。
1.コマンドプロンプトの文字コードの設定を確認する
コマンドプロンプトを開き「chcp」と入力し、Enterを押すと現在の文字コード(識別子)が表示されます。

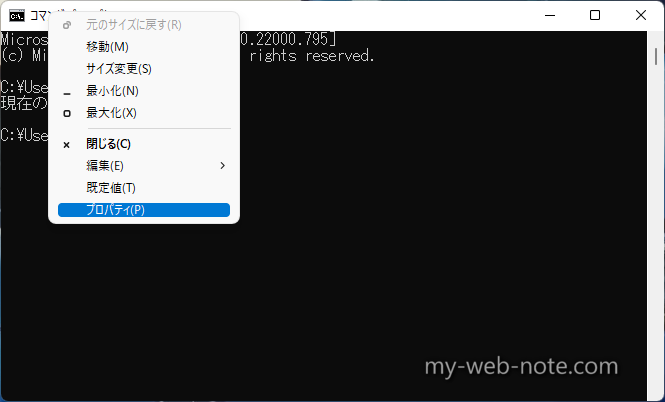
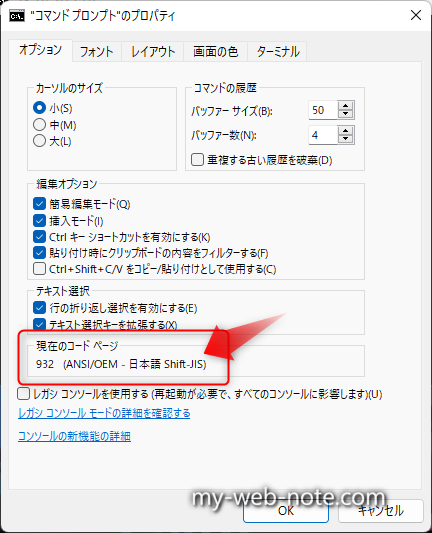
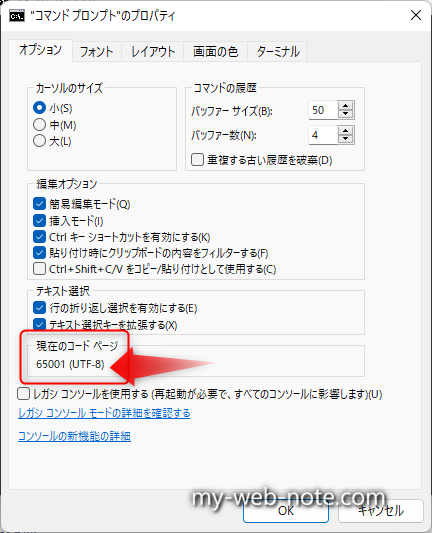
もしくは、コマンドプロンプトのタイトルを右クリック→「プロパティ」の『現在のコードページ』で確認可能です。
[st-cmemo fontawesome=”fa-external-link” iconcolor=”#BDBDBD” bgcolor=”#fafafa” color=”#757575″ bordercolor=”” borderwidth=”” iconsize=””]
識別子がどの文字コードを表しているかは、下記を参照して下さい。
[/st-cmemo]
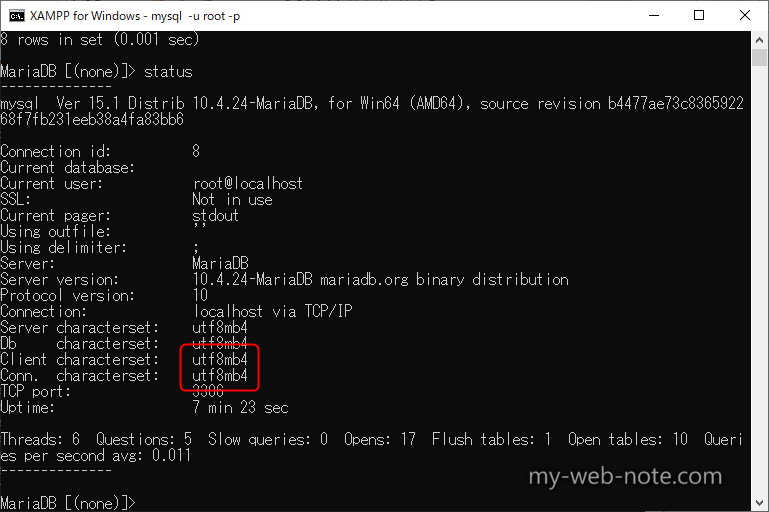
2.データベース側の文字コードの設定を確認する
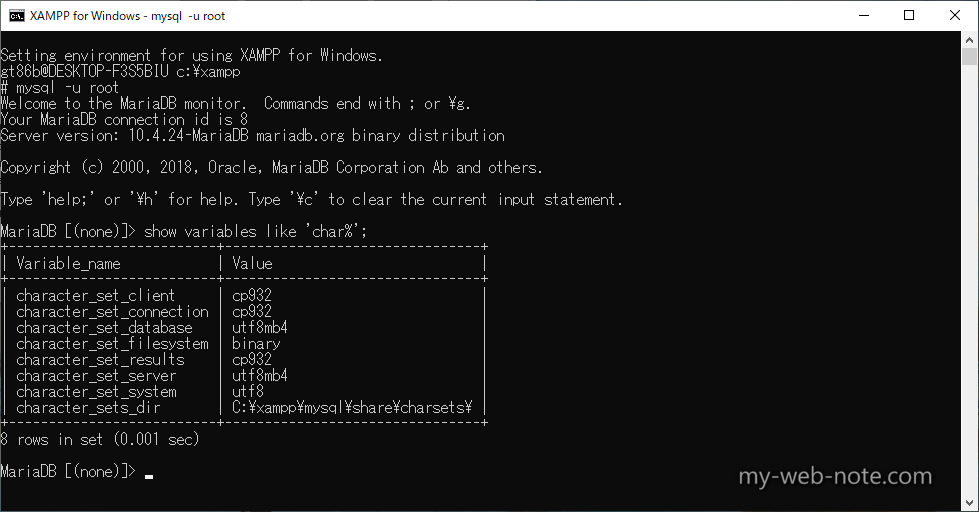
データベースにログインして、下記コマンドを実行
MariaDB [(none)]> status;
表示された設定の「Client characterset;」と「Conn. characterset;」の文字コードを確認する。
[st-cmemo fontawesome=”fa-file-text-o” iconcolor=”#919191″ bgcolor=”#fafafa” color=”#000000″ bordercolor=”” borderwidth=”” iconsize=””]
上記で表示しているのは、xamppでインストールしたMySQL(MariaDB)の初期値の設定。※2022年現在
[/st-cmemo]
デフォルトだと「utf8mb4」となっているため、DB側はクライアントから「UTF-8」で文字列が入力され、かつ受信した文字列を「UTF-8」に変換して保存する設定になっている。
つまり、表示する側のコマンドプロンプトも「UTF-8」じゃないと文字化けが発生する。
「utf8mb4」については、下記記事を参考にして下さい。
[st-cmemo fontawesome=”fa-bookmark” iconcolor=”#BDBDBD” bgcolor=”#fafafa” color=”#757575″ bordercolor=”” borderwidth=”” iconsize=””]
10.1.10.7 utf8mb4 文字セット (4 バイトの UTF-8 Unicode エンコーディング)
[/st-cmemo]
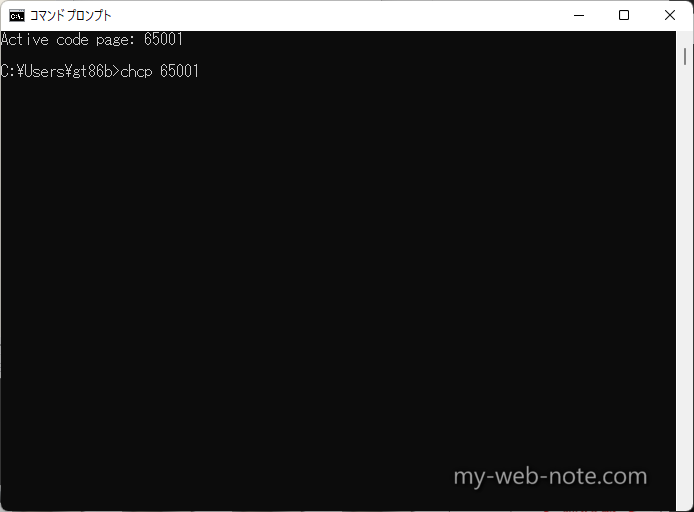
3.コマンドプロンプトの文字コードの設定を変更する
コマンドプロンプトを開き、下記を入力してEnter。
chcp 65001
「Active code page: 65001」と表示されれば、コマンドプロンプトの文字コードが「UTF-8」に変更されます。
コマンドプロンプトのプロパティの「現在のコードページ」でも文字コードが「65001 (UTF-8)」になっていることがわかります。
文字コードを変更した状態で、もう一度DBにアクセスして、文字化けが発生するかどうか確認して下さい。
[st-cmemo fontawesome=”fa-exclamation-circle” iconcolor=”#ef5350″ bgcolor=”#ffebee” color=”#000000″ iconsize=”200″]
- 文字コードを変更しても、コマンドプロンプトで使用している『フォント』が日本語非対応のフォントの場合でも文字化けが発生します。※参考記事
- コマンドプロンプトの文字コードは、ウィンドウを閉じると元の文字コード(Shift-JIS)に戻ってしまいます。変更した文字コードに固定(保存)する場合は、レジストリを変更する必要があります。※参考記事
[/st-cmemo]
MySQLの日本語の文字化けを治す方法②
データベース側の文字コードを「CP932」に変更する
方法①でも記載した通り、コマンドプロンプトのデフォルトの文字コードは「Shift-JIS」。MySQLのデフォルトの文字コードは、2022年現在では「utf8mb4」。
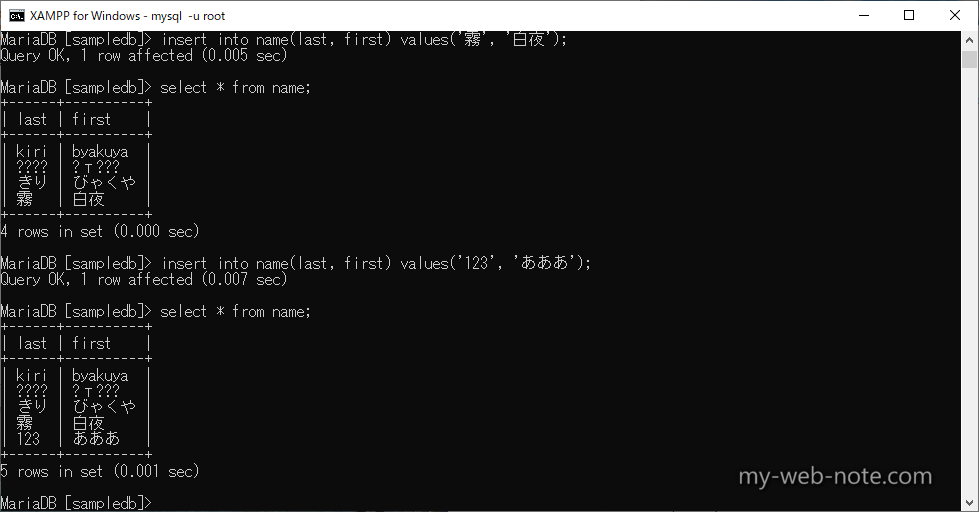
このコマンドプロンプトで日本語のデータをDBに入力すると、文字コードが一致していないので、入力した日本語が文字化け状態で保存されてしまう。
現状の解決方法として、一番てっとり早いのがDB側の文字コードを「CP932(≒Shif-JIS)」に変更すること。
Microsoftコードページ932
Microsoft コードページ 932は(以下 CP932)、マイクロソフト及び、MS-DOSのOEMベンダがShift_JISを独自に拡張した文字コードである。また、同時にCP932は、Shift_JISのWindowsアプリケーションにおける「実装」を指す用語であるとも言える。
引用:wiki
[st-cmemo fontawesome=”fa-exclamation-circle” iconcolor=”#ef5350″ bgcolor=”#ffebee” color=”#000000″ iconsize=”200″]
- DB内にデータが保存されている場合は、必ずバックアップを保存してから行って下さい。
- 既に文字コードが不一致(Shift-JIS:utf8mb4)の状態で入力したデータは、文字化け状態で保存されているので諦めて削除しましょう。
[/st-cmemo]
1.データベース側の文字コードの設定を確認する。
データベースにログインして、下記コマンドを実行し、各文字コードの設定を確認します。
MariaDB [(none)]> show variables like 'char%';
下記が、MySQLのデフォルトの文字コードの設定。
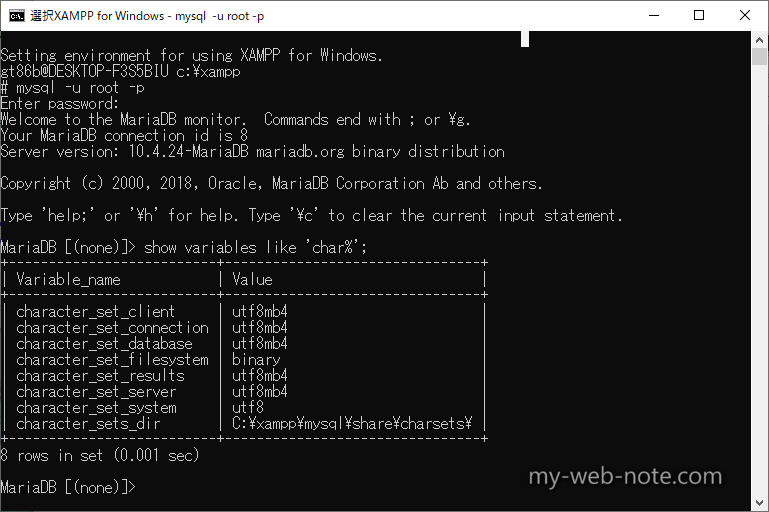
各設定(システム変数)の詳細は下記の通りです。
| character_set_client | クライアントが送信してくるとサーバー側が想定している文字コード |
| character_set_connection | クライアントから受け取った文字をこの文字コードへ変換する |
| character_set_database | デフォルトデータベースで使用される文字セット |
| character_set_filesystem | ファイル名の文字コード |
| character_set_result | クライアントへ結果を返す時の文字コード |
| character_set_server | 新規にデーターベースを作るときの文字コード |
| character_set_system | システム側で使用する文字コード |
| character_set_dir | 文字コードが設定されているフォルダのパス |
詳細は公式サイトを参照して下さい。
[st-cmemo fontawesome=”fa-external-link” iconcolor=”#BDBDBD” bgcolor=”#fafafa” color=”#757575″ bordercolor=”” borderwidth=”” iconsize=””]
[/st-cmemo]
今回実行する作業で「character_set_client」「character_set_connection」「character_set_result」の3つを「cp932」に変化します。
2.データベース設定を書き換えて、文字コードを変更する。
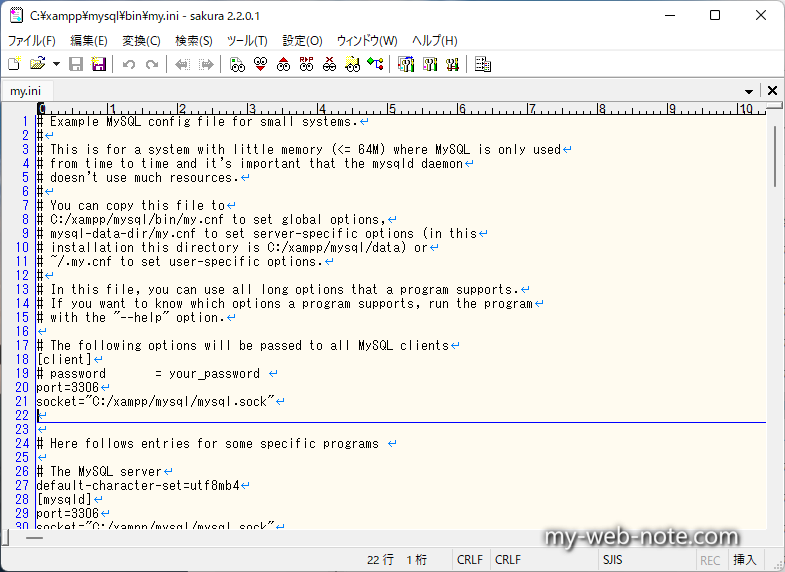
一旦MySQLを停止して「my.ini」をテキストエディタで開く。
[st-cmemo fontawesome=”st-svg-bigginer_l” iconcolor=”#9CCC65″ bgcolor=”#F1F8E9″ color=”#000000″ bordercolor=”” borderwidth=”” iconsize=””]
- 設定ファイル(my.ini)は、xamppの場合は「C:\xampp\mysql\bin\my.ini」に保存されています。
- MacやLinuxの場合は拡張子が異なり「my.cnf」です。
[/st-cmemo]
my.iniの[client]と[mysql]に「default-character-set=cp932」を追加する。
[client]
default-character-set=cp932

[mysql]
default-character-set=cp932
デフォルトの「my.ini」に編集する前提だと、下記(27行目&168行目)のように追加すればOK。
# Example MySQL config file for small systems.
#
# This is for a system with little memory (<= 64M) where MySQL is only used
# from time to time and it's important that the mysqld daemon
# doesn't use much resources.
#
# You can copy this file to
# C:/xampp/mysql/bin/my.cnf to set global options,
# mysql-data-dir/my.cnf to set server-specific options (in this
# installation this directory is C:/xampp/mysql/data) or
# ~/.my.cnf to set user-specific options.
#
# In this file, you can use all long options that a program supports.
# If you want to know which options a program supports, run the program
# with the "--help" option.

# The following options will be passed to all MySQL clients
[client]
# password       = your_password
port=3306
socket="C:/xampp/mysql/mysql.sock"


# Here follows entries for some specific programs

# The MySQL server
default-character-set=cp932
[mysqld]
port=3306
socket="C:/xampp/mysql/mysql.sock"
basedir="C:/xampp/mysql"
tmpdir="C:/xampp/tmp"
datadir="C:/xampp/mysql/data"
pid_file="mysql.pid"
# enable-named-pipe
key_buffer=16M
max_allowed_packet=1M
sort_buffer_size=512K
net_buffer_length=8K
read_buffer_size=256K
read_rnd_buffer_size=512K
myisam_sort_buffer_size=8M
log_error="mysql_error.log"

# Change here for bind listening
# bind-address="127.0.0.1"
# bind-address = ::1          # for ipv6

# Where do all the plugins live
plugin_dir="C:/xampp/mysql/lib/plugin/"

# Don't listen on a TCP/IP port at all. This can be a security enhancement,
# if all processes that need to connect to mysqld run on the same host.
# All interaction with mysqld must be made via Unix sockets or named pipes.
# Note that using this option without enabling named pipes on Windows
# (via the "enable-named-pipe" option) will render mysqld useless!
#
# commented in by lampp security
#skip-networking
#skip-federated

# Replication Master Server (default)
# binary logging is required for replication
# log-bin deactivated by default since XAMPP 1.4.11
#log-bin=mysql-bin

# required unique id between 1 and 2^32 - 1
# defaults to 1 if master-host is not set
# but will not function as a master if omitted
server-id	=1

# Replication Slave (comment out master section to use this)
#
# To configure this host as a replication slave, you can choose between
# two methods :
#
# 1) Use the CHANGE MASTER TO command (fully described in our manual) -
#    the syntax is:
#
#    CHANGE MASTER TO MASTER_HOST=, MASTER_PORT=,
#    MASTER_USER=, MASTER_PASSWORD= ;
#
#    where you replace , ,  by quoted strings and
#     by the master's port number (3306 by default).
#
#    Example:
#
#    CHANGE MASTER TO MASTER_HOST='125.564.12.1', MASTER_PORT=3306,
#    MASTER_USER='joe', MASTER_PASSWORD='secret';
#
# OR
#
# 2) Set the variables below. However, in case you choose this method, then
#    start replication for the first time (even unsuccessfully, for example
#    if you mistyped the password in master-password and the slave fails to
#    connect), the slave will create a master.info file, and any later
#    change in this file to the variables' values below will be ignored and
#    overridden by the content of the master.info file, unless you shutdown
#    the slave server, delete master.info and restart the slaver server.
#    For that reason, you may want to leave the lines below untouched
#    (commented) and instead use CHANGE MASTER TO (see above)
#
# required unique id between 2 and 2^32 - 1
# (and different from the master)
# defaults to 2 if master-host is set
# but will not function as a slave if omitted
#server-id       = 2
#
# The replication master for this slave - required
#master-host     =
#
# The username the slave will use for authentication when connecting
# to the master - required
#master-user     =
#
# The password the slave will authenticate with when connecting to
# the master - required
#master-password =
#
# The port the master is listening on.
# optional - defaults to 3306
#master-port     =
#
# binary logging - not required for slaves, but recommended
#log-bin=mysql-bin


# Point the following paths to different dedicated disks
#tmpdir = "C:/xampp/tmp"
#log-update = /path-to-dedicated-directory/hostname

# Uncomment the following if you are using BDB tables
#bdb_cache_size = 4M
#bdb_max_lock = 10000

# Comment the following if you are using InnoDB tables
#skip-innodb
innodb_data_home_dir="C:/xampp/mysql/data"
innodb_data_file_path=ibdata1:10M:autoextend
innodb_log_group_home_dir="C:/xampp/mysql/data"
#innodb_log_arch_dir = "C:/xampp/mysql/data"
## You can set .._buffer_pool_size up to 50 - 80 %
## of RAM but beware of setting memory usage too high
innodb_buffer_pool_size=16M
## Set .._log_file_size to 25 % of buffer pool size
innodb_log_file_size=5M
innodb_log_buffer_size=8M
innodb_flush_log_at_trx_commit=1
innodb_lock_wait_timeout=50

## UTF 8 Settings
#init-connect=\'SET NAMES utf8\'
#collation_server=utf8_unicode_ci
#character_set_server=utf8
#skip-character-set-client-handshake
#character_sets-dir="C:/xampp/mysql/share/charsets"
sql_mode=NO_ZERO_IN_DATE,NO_ZERO_DATE,NO_ENGINE_SUBSTITUTION
log_bin_trust_function_creators=1

character-set-server=utf8mb4
collation-server=utf8mb4_general_ci
[mysqldump]
max_allowed_packet=16M

[mysql]
# Remove the next comment character if you are not familiar with SQL
#safe-updates
default-character-set=cp932

[isamchk]
key_buffer=20M
sort_buffer_size=20M
read_buffer=2M
write_buffer=2M

[myisamchk]
key_buffer=20M
sort_buffer_size=20M
read_buffer=2M
write_buffer=2M

[mysqlhotcopy]
「my.ini」を保存してMySQLを再起動。再起動後、もう一度文字コードの設定を確認し「character_set_client」「character_set_connection」「character_set_result」がcp932に変更されていることを確認して下さい。
これで文字コードの設定は完了です。適当なテーブルに日本語のデータを入力して、文字化けが発生しないことを確認して下さい。
以上、有難うございましたm(_ _)m

参考になったらポッチとお願いしますm(_ _)m

![]()
![]()
![]()


コメント